Mastering Focus on the Fujifilm X100VI
Street photography is all about timing. The ability to capture fleeting moments as they unfold requires a camera that can keep up. While Fujifilm has made significant improvements to autofocus with the X100VI, it still lags behind the blazing-fast AF systems found in Sony, Canon, and Nikon cameras. Tracking can be inconsistent, face detection isn’t always reliable, and low-light AF performance can struggle compared to competitors. That said, with the right settings and techniques, you can work around these limitations and make the most of the X100VI’s autofocus system for street photography. This guide will help you fine-tune your AF settings to ensure you never miss a decisive moment.

The X100VI offers three focus modes:
1. Manual Focus (MF) – Offers full control over focusing, with features like focus peaking and magnification.
2. Continuous Autofocus (AF-C) – Tracks movement dynamically.
3. Single Autofocus (AF-S) – Best for static or slow-moving subjects.
Focus Area Settings - Choosing the Right Tool for the Scene:
Single Point
Gives you precise control over where the camera focuses. Perfect for composed shots.

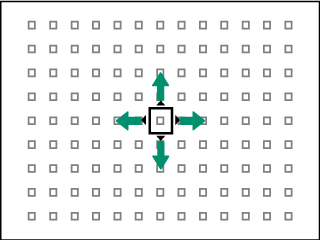
Zone AF
A larger focus area, represented as a matrix of single points. Great for tracking moving subjects while maintaining some control.

Wide/Tracking
The camera decides where to focus & what to lock onto. This setting can be useful in general situations or when you have a single subject that you expect to come into the frame, but generally I find it too unpredictable for street photography.
For street photography, I recommend three specific setups depending on your approach:
• AF-S + Single Point – The best choice for precise composition when shooting still or slow-moving subjects. Set your focus point with the joystick and shoot when ready. The majority of my shots on the Fuji last year were shot using this method. I find that the AF is fastest in this setting, but keeping the focus point on your subject if they’re moving can be challenging.
• AF-C + Zone Focus + 5 FPS Burst – Ideal for capturing action and movement. This has lately been my go to method often times leveraging the 3x3 zone. The camera decides which point to focus on in the selected zone, combine it with a low speed burst and you’ll have a greater chance of capturing your subject in focus.
• Manual Focus with Pre-Focus – A classic range-focusing technique used by street photographers to eliminate lag altogether. This method is a great way to train yourself for a real rangefinder like a Leica M or Canon Canonet. I highly recommend setting up focus peaking when using Manual Focus.
For the best balance of speed and control, I recommend Single Point for AF-S shots and Zone AF for AF-C shooting when tracking movement. The best part about both of these methods is that they work well regardless of whether or not you’re using your hybrid viewfinder in either OVF or EVF mode.
Face and Eye Detection: When (and When Not) to Use It
Face and Eye Detection can be useful for intentional, non-candid portraits, ensuring that your subject’s eyes remain in sharp focus. However, in most street photography scenarios, I suggest turning it off. Why?
• It prioritizes faces over composition, which can be unpredictable when photographing multiple subjects.
• The AF system might hesitate or shift focus if multiple faces appear in the frame. I find that more often than not with this setting enabled I actually end up missing focus, albeit by a small amount. This might be acceptable at slower apertures with greater depth of field, like ƒ8 and above, but since I usually shoot around ƒ5.6 or faster it’s not great for me.
• For street photography, selecting the focus point or zone manually gives you more control over the final image.
• Maybe most importantly - you get inconsistent behavior with Face/Eye/Subject detection turned on, since this functionality is limited to either the EVF or the rear screen - it doesn’t work in the OVF. I flip between EVF and OVF constantly in the streets, leveraging the EVF to check exposure / white balance & the OVF to see “outside” the frame lines in order to anticipate when my subject will be coming into the frame. Once in OVF mode the hybrid viewfinder disables any subject detection / tracking.
If you’re engaging with a subject and shooting a posed portrait, it can be worth turning on, but for fast-paced street scenes, stick to Single Point or Zone AF.
Low-Light Autofocus Performance:
The X100VI performs well in low-light conditions, but there are some considerations:
• AF can slow down in dim lighting due to reduced contrast.
• Switching to a wider focus area (Zone AF) can help the camera find focus faster.
• The EVF and focus peaking in Manual Focus mode can be incredibly useful when shooting in very dark environments.
• If autofocus struggles, use pre-focusing or the AF assist light (though the latter might be distracting for street photography).
For low-light scenes where speed is critical, switch to MF and use range focusing.
Customizing AF for Street Photography:
To make the most of the X100VI’s autofocus system, customize the following settings:
• AF-Lock Button – Use this to lock focus on a subject before recomposing.
• Back-Button Focus – Separate focusing from the shutter button by assigning AF to the rear button, helping with pre-focusing techniques.
Setting up your camera for quick adjustments makes a huge difference in unpredictable street environments.
Pre-Focusing Techniques for Faster Shooting:
One of the best ways to overcome AF lag in street photography is pre-focusing:
• Using Manual Focus with Range Focusing – Set your focus distance in advance, typically around 6-10 feet at f/8-f/11, to keep most of your scene in focus.
• Using AF-Lock to Pre-Focus – Aim at a spot where you anticipate action, lock focus, and wait for the subject to enter the frame.
• Leveraging the Distance Scale – The X100VI’s MF mode shows a focus scale, allowing you to pre-set focus for specific distances.
These techniques eliminate the need for autofocus, allowing for instant shutter response.
Final Thoughts:
The Fujifilm X100VI’s autofocus system is powerful, but for street photography, the key is simplicity and speed. By understanding and customizing the AF settings to your shooting style, you can increase your chances of nailing decisive moments with precision.
• Use AF-S + Single Point for static shots.
• Use AF-C + Zone AF + 5 FPS for moving subjects.
• Use Manual Focus + Pre-Focusing to eliminate AF lag.
Mastering these techniques will help you shoot more intuitively, allowing you to focus on storytelling rather than fiddling with settings.
Have you tried these settings on your X100VI? Let me know how they work for you!